Kubernetes storage refers to the management of persistent and ephemeral data for applications running in Kubernetes clusters. It plays a key role in ensuring that applications can store and retrieve data outside the lifecycle of the pods (containers), which by default are ephemeral and may be deleted or replaced at any time. Kubernetes provides a variety of tools and resources for managing storage needs for cloud-native applications.
***Key Concepts of Docker Storage Drivers and File Systems:
Understanding Docker Data Storage
Docker stores data and manages container file systems using a structured approach.
By default, Docker stores its data under the
/var/lib/docker/directory, which includes:AUFS
Containers
Images
Volumes
Each folder serves a specific purpose:
Container files are in the
containersfolder.Image data resides in the
imagefolder.Volumes created by containers are stored in the
volumesfolder.
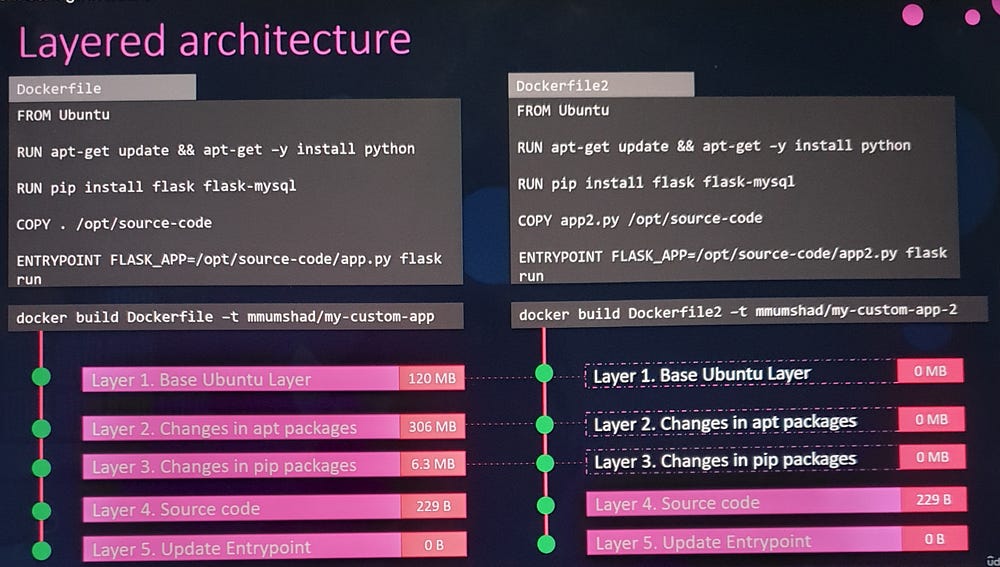
Layered Architecture of Docker Images
Docker builds images using a layered approach:
Each instruction in the
Dockerfilegenerates a new layer.Layers are cached and reused for efficiency.
.
Writable Layer in Containers
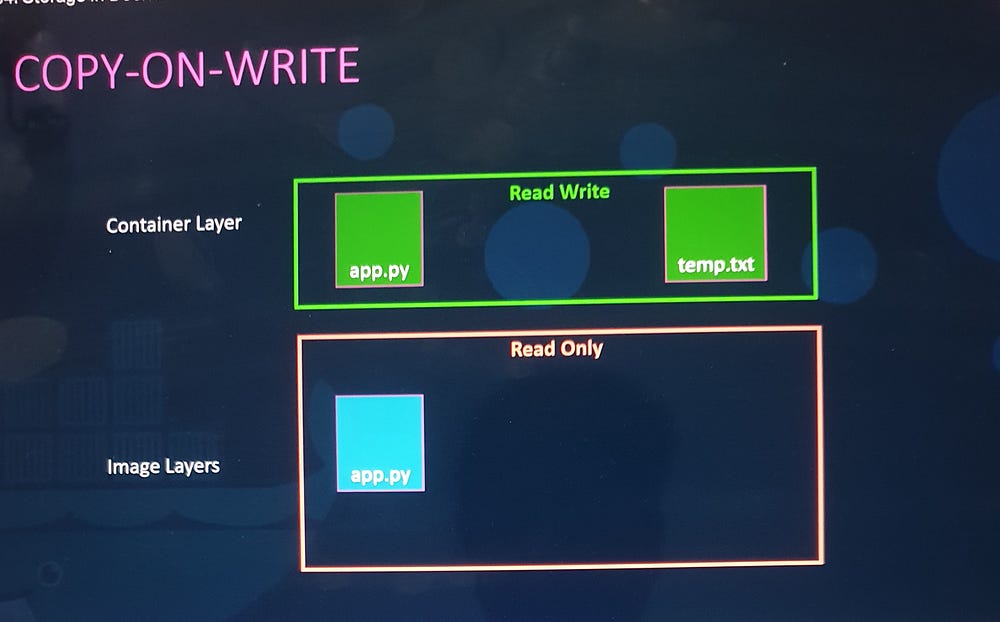
When a container is created, a writable layer is added on top of the image layers:
Stores temporary files, logs, and modifications.
Data in the writable layer is ephemeral and deleted when the container is removed.
Copy-on-Write Mechanism
Docker uses a Copy-on-Write strategy:
Modifications to files in image layers create a copy in the writable layer.
Image layers remain unchanged.
Persisting Data with Volumes
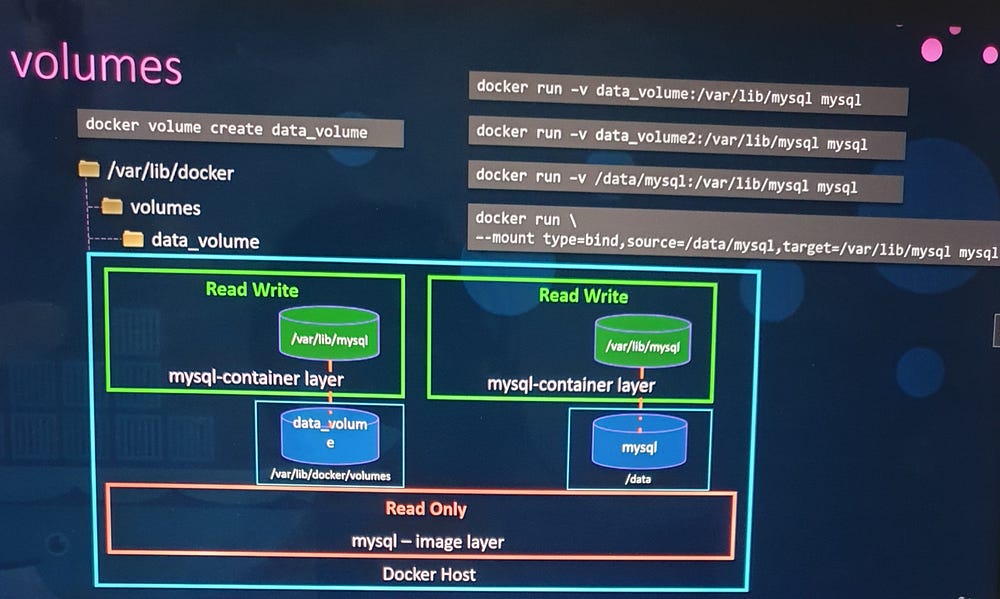
To retain data beyond the container lifecycle, use volumes:
Create a volume:
docker volume create <volume_name>Mount the volume:
docker run -v <volume_name>:<container_path> <image_name>Data persists on the host even if the container is deleted.
Bind Mounts
Bind mounts allow containers to access existing directories on the host:
Example:
docker run -v /host_path:/container_path <image_name>Useful for sharing host files with containers.
Volume Mounts vs. Bind Mounts
Volume Mounts: Use Docker-managed volumes stored in
/var/lib/docker/volumes.Bind Mounts: Use specific host directories for data storage.
New Mount Syntax
- Modern Docker uses
--mountfor more detailed configurations
docker run --mount type=bind,source=/host_path,target=/container_path <image_name>
Role of Storage Drivers
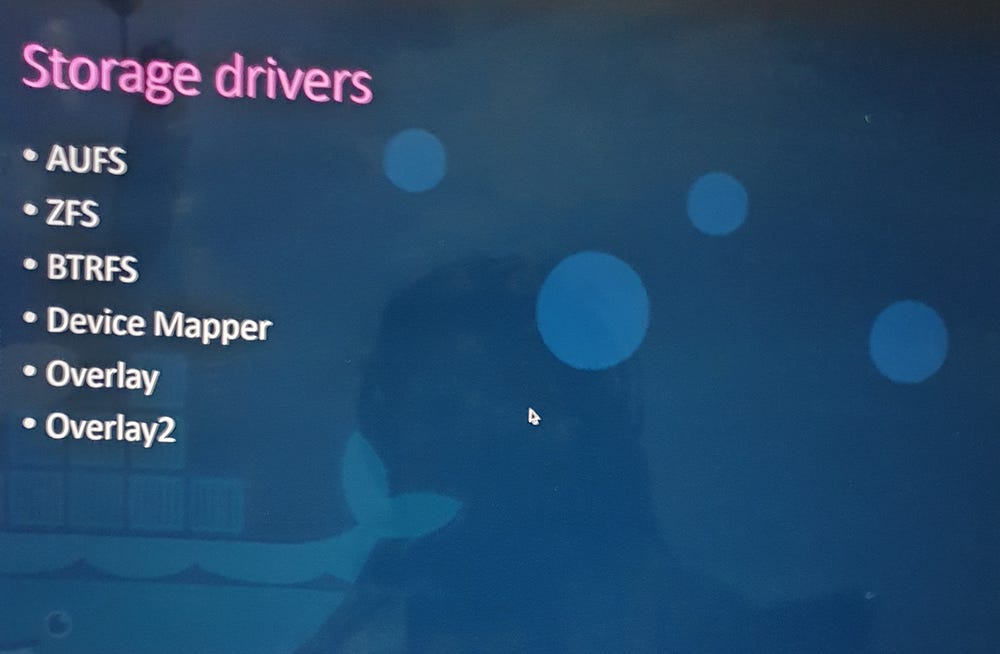
Storage drivers manage Docker’s layered architecture and enable features like writable layers and Copy-on-Write.
Common drivers include:
AUFS (default on Ubuntu)
Overlay2 (widely used for newer systems)
Device Mapper, BTRFS, and ZFS
Selection depends on the operating system and application needs.
Performance and Compatibility
Each storage driver offers unique performance and stability characteristics.
Docker automatically selects an optimal driver based on the host system.
***Volume Drivers:
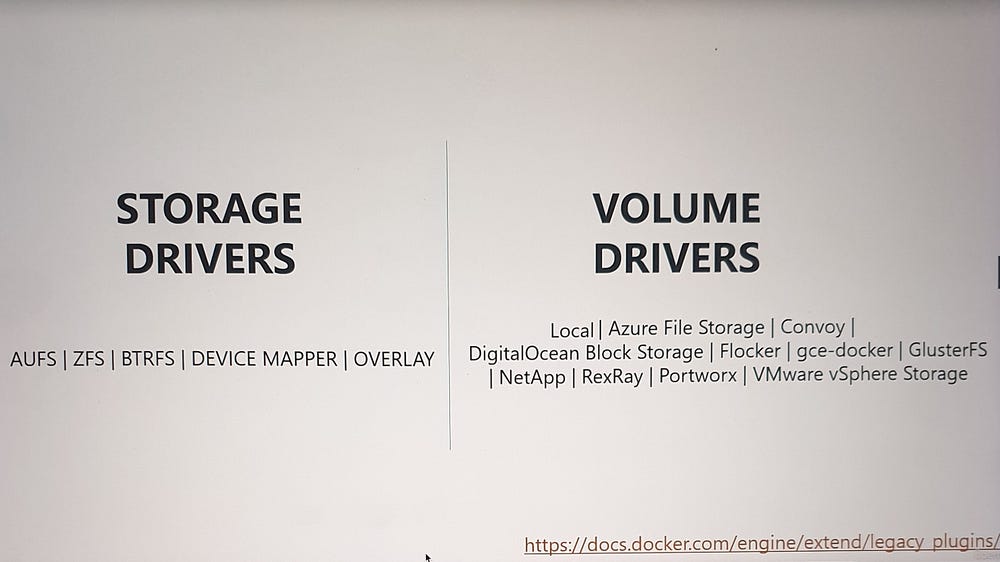
Storage Drivers vs. Volume Drivers
Storage Drivers: Handle the layered storage architecture for images and containers, managing file systems and ensuring efficient operations.
Volume Drivers: Dedicated plugins for managing persistent volumes independently of storage drivers.
Default Volume Driver: Local Plugin
By default, Docker uses the local volume plugin to create volumes.
Volumes managed by the local plugin are stored on the Docker host under the
/var/lib/docker/volumesdirectory.
Third-Party Volume Driver Plugins
Docker supports a variety of third-party volume drivers to provision storage across different platforms.
Examples of volume drivers include:
Azure File Storage
Convoy
DigitalOcean Block Storage
Flocker
Google Compute Persistent Disks
NetApp
REX-Ray
Portworx
VMware vSphere Storage
Multi-Provider Support
Some volume drivers integrate with multiple storage providers. For instance:
REX-Ray: Supports provisioning across platforms such as:
Amazon EBS and S3
EMC storage arrays (e.g., Isilon and ScaleIO)
Google Persistent Disk
OpenStack Cinder
Using Specific Volume Drivers
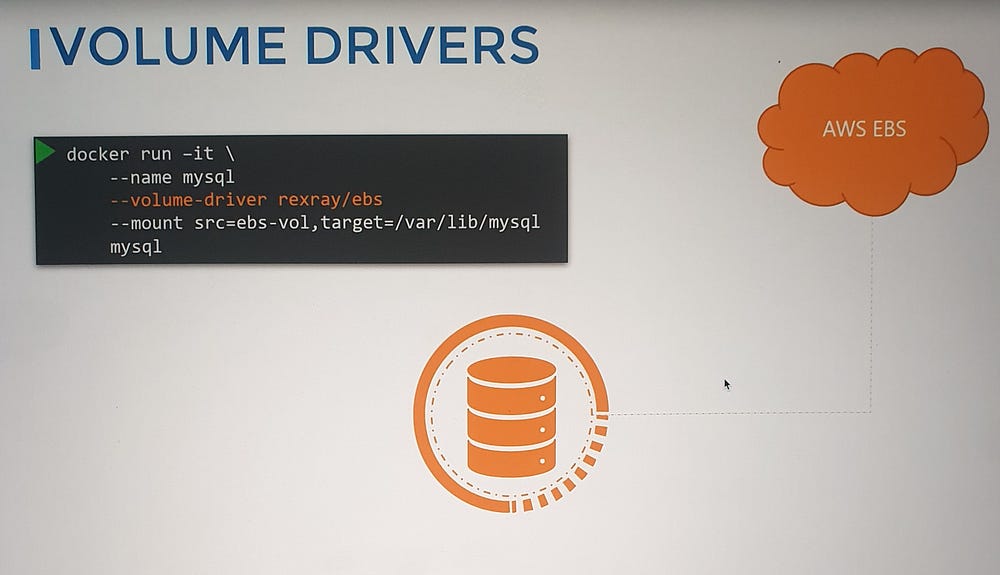
When running a container, you can specify a volume driver to leverage third-party storage solutions.
Example: Using REX-Ray EBS, a volume can be provisioned directly from Amazon EBS and attached to a container. The data persists in the cloud, ensuring durability even after the container exits.
***Container Storage Interface(CSI):
1. Kubernetes and Container Runtime Evolution
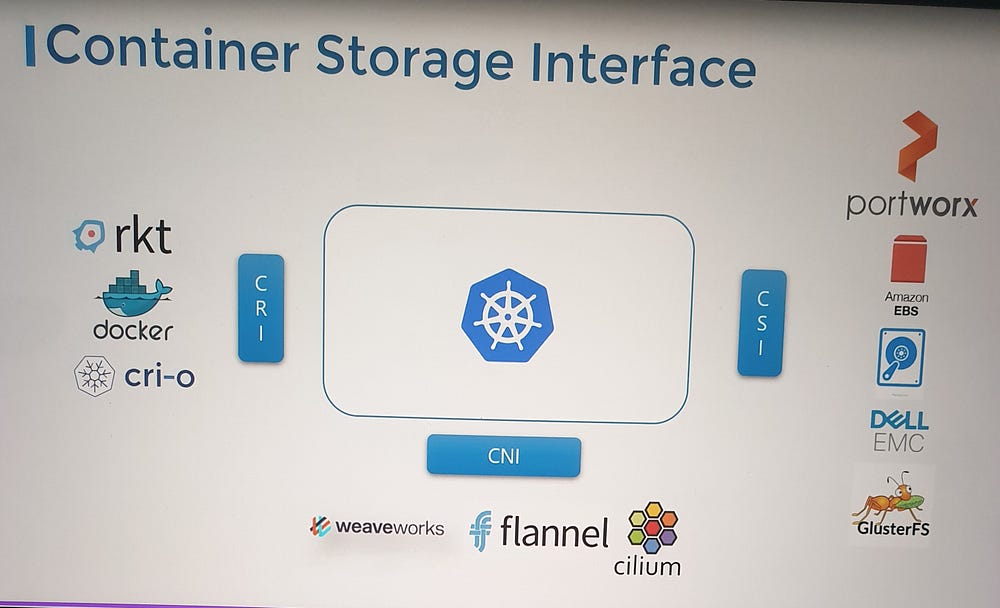
Initially, Kubernetes relied solely on Docker as its container runtime engine, with the integration directly embedded into Kubernetes’ source code.
With the emergence of alternative runtimes like RKT and CRI-O, the need for a more flexible and extensible approach became evident.
2. Introduction of the Container Runtime Interface (CRI)
The CRI standard was introduced to decouple Kubernetes from specific container runtimes.
CRI defines how orchestration platforms like Kubernetes communicate with container runtimes.
Benefits of CRI:
Support for multiple container runtimes without modifying Kubernetes source code.
New runtimes can work with Kubernetes by adhering to CRI standards.
3. Parallels with Other Interfaces
Similar to the CRI, Kubernetes introduced other interfaces for extensibility:
Container Networking Interface (CNI): Enables Kubernetes to work with various networking solutions.
Container Storage Interface (CSI): Supports integration with multiple storage providers.
4. Overview of the Container Storage Interface (CSI)
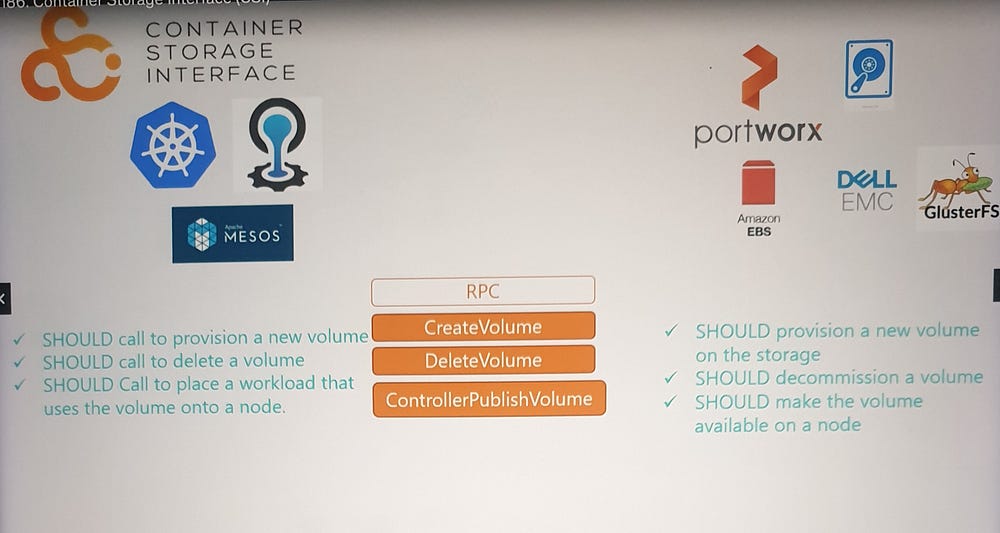
Purpose: A universal standard that allows any container orchestration tool (e.g., Kubernetes, Cloud Foundry, Mesos) to work with any storage vendor via supported plugins.
Adoption: Storage vendors like Portworx, Amazon EBS, Azure Disk, NetApp, Dell EMC, and others have developed their own CSI drivers.
5. How CSI Works
- CSI defines Remote Procedure Calls (RPCs) to manage storage operations.
Example RPCs:
CreateVolume: Kubernetes calls this RPC to request a new volume, and the storage driver provisions the volume and returns results.DeleteVolume: Kubernetes calls this RPC to delete a volume, and the driver handles decommissioning the volume.
CSI specifies:
Parameters exchanged during operations.
Expected results and error codes.
6. Advantages of CSI
Simplifies storage integration by defining clear standards.
Supports extensibility for new storage vendors without requiring changes to Kubernetes code.
Universality: Not specific to Kubernetes, enabling compatibility with other orchestrators.
7. For Further Details
- The CSI specification is available on GitHub for those interested in the technical details of its implementation and standards.
***Volumes:
Understanding Volumes in Kubernetes
1. Volumes in Docker
Containers in Docker are designed to be transient, meaning:
They exist temporarily to process tasks and are destroyed after completing their work.
Data inside Docker containers is also ephemeral, and once a container is deleted, its data is lost.
To persist data processed by Docker containers, volumes are attached to the containers at creation.
- The volume serves as an external storage location, ensuring that data remains accessible even after the container is deleted.
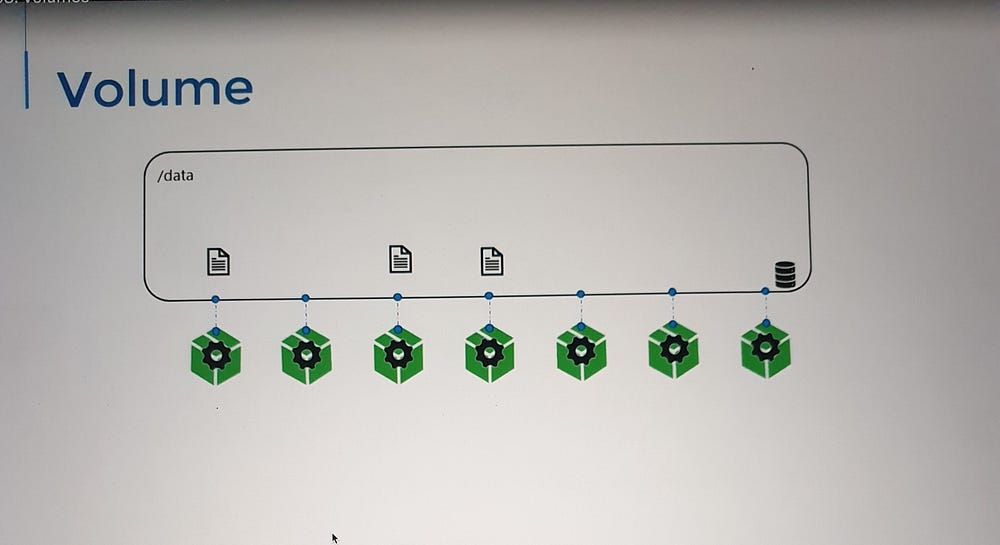
2. Volumes in Kubernetes
Similarly, Pods in Kubernetes are transient by nature:
When a Pod is created, it processes tasks, generates data, and is eventually destroyed.
Without volumes, the data processed by a Pod is also lost upon deletion.
To address this, Kubernetes provides volumes that can be attached to Pods.
The data generated by the Pod is stored in the volume.
Even after the Pod is deleted, the data persists in the volume.
3. Simple Implementation of Volumes
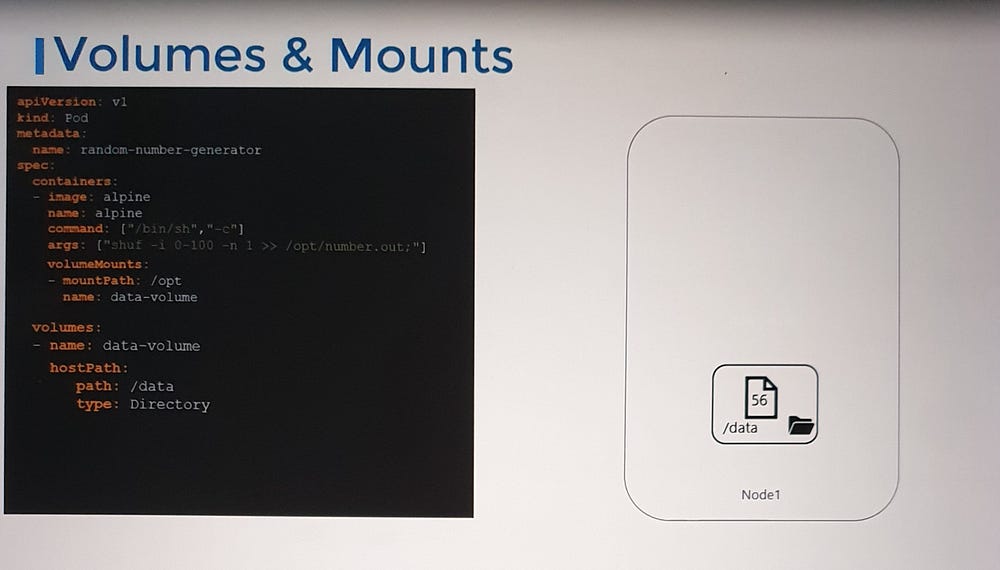
Consider a scenario where:
A Pod generates a random number and writes it to a file (
/opt/number.out) inside the container.Without a volume, the random number is deleted along with the Pod.
To retain the data:
A volume is created and configured to use a directory on the host node (e.g.,
/data).The volume is mounted to a specific directory inside the container (
/opt).
Now:
The random number written to
/opt/number.outinside the container is saved in the volume.This volume is stored at
/dataon the host, ensuring the data remains even if the Pod is deleted.
4. Volume Storage Options
Kubernetes supports various storage backends for volumes. Some common options include:
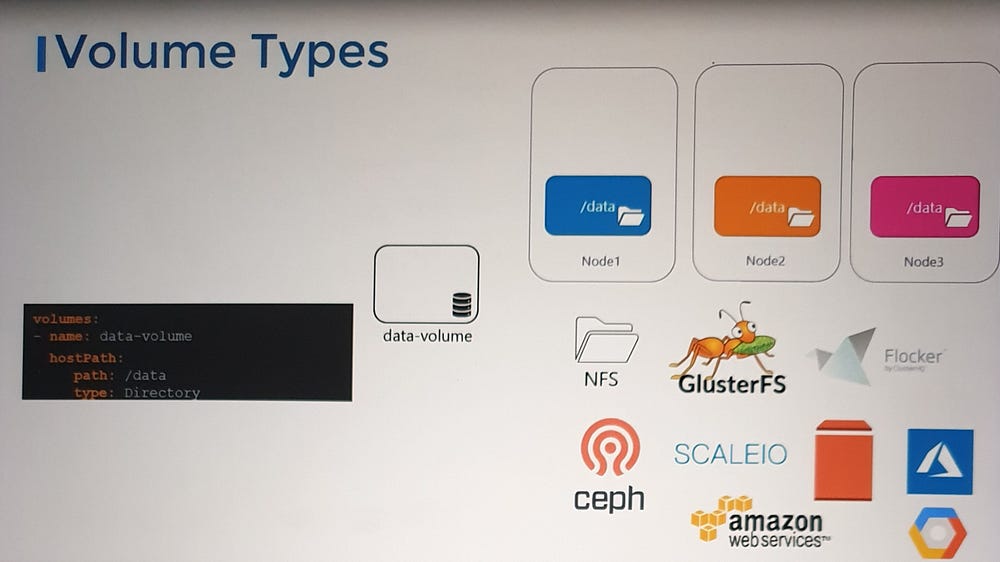
a. HostPath:
Uses a directory on the host node as storage for the volume.
Suitable for single-node clusters but not ideal for multi-node clusters, as:
Each node’s
/datadirectory is independent.Data consistency cannot be ensured across nodes.
b. Networked Storage:
Provides shared storage across multiple nodes.
Common options:
NFS (Network File System)
CephFS
GlusterFS
c. Cloud-Based Solutions:
Integrate with public cloud providers:
AWS EBS (Elastic Block Store)
Azure Disk/File
Google Persistent Disk
Cloud-based volumes are ideal for scalable, highly available setups.
5. Configuring a Volume with Storage Backends
Let’s look at examples of using different storage backends:
a. HostPath Example:
volumes:
  - name: data-volume
    hostPath:
      path: /data
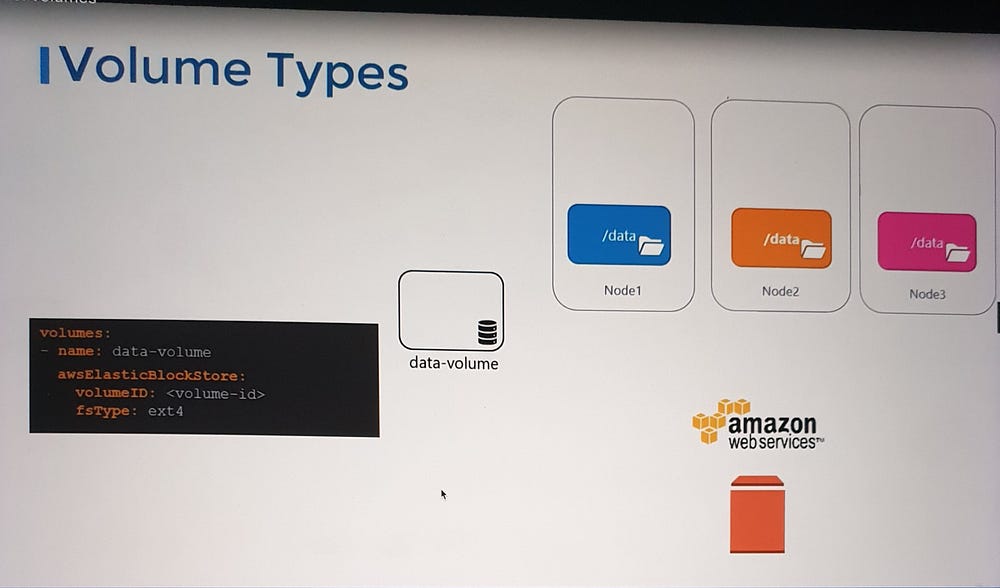
b. AWS EBS Example:
volumes:
  - name: data-volume
    awsElasticBlockStore:
      volumeID: "<volume-id>"
      fsType: ext4
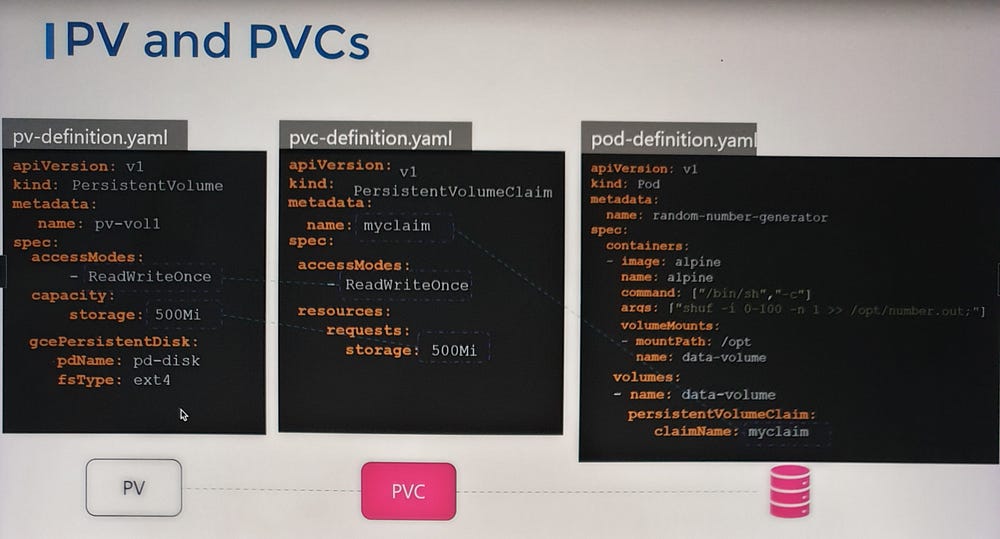
6. Persistent Volumes
For dynamic and scalable storage management, Kubernetes provides:
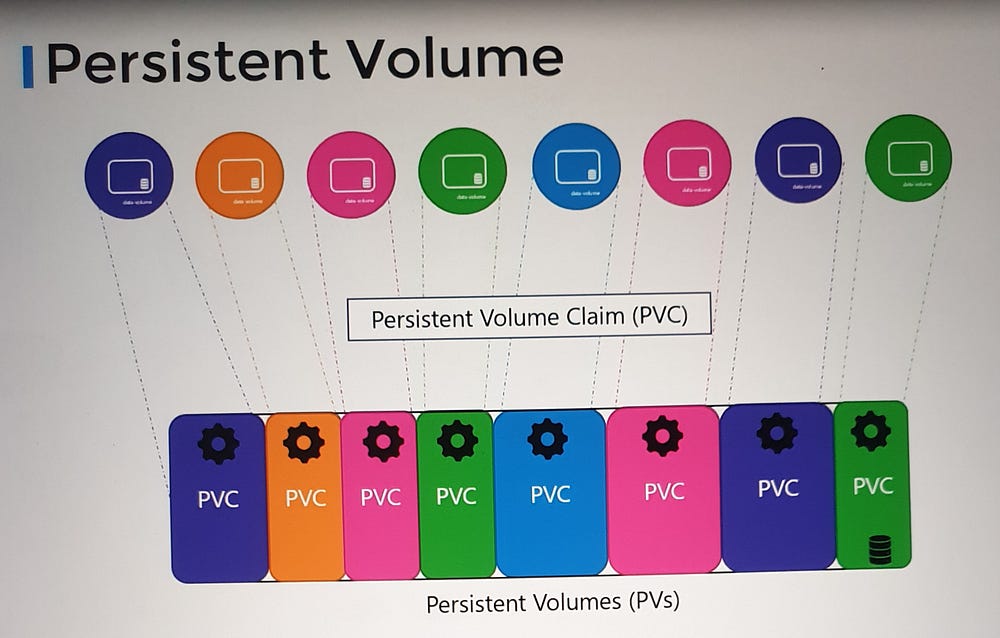
Persistent Volumes (PVs): Pre-provisioned or dynamically provisioned storage resources in the cluster.
Persistent Volume Claims (PVCs): Requests for storage made by Pods.
The PVC binds to a PV, allowing data persistence even across Pod lifecycles.
***Persistent Volumes in Kubernetes
Challenges with Pod-Level Volume Configuration
We configured volumes directly within the Pod definition file. While this approach works, it introduces challenges in large environments with many users and applications:
Repeated Configuration: Users must specify storage settings for each Pod, duplicating effort.
Maintenance Overhead: Any changes to storage configurations require updates across all Pod definitions, increasing complexity.
Scalability Issues: Managing storage at the Pod level is inefficient in environments with high workloads and multiple users.
To address these challenges, Kubernetes introduces Persistent Volumes (PVs).
Persistent Volumes
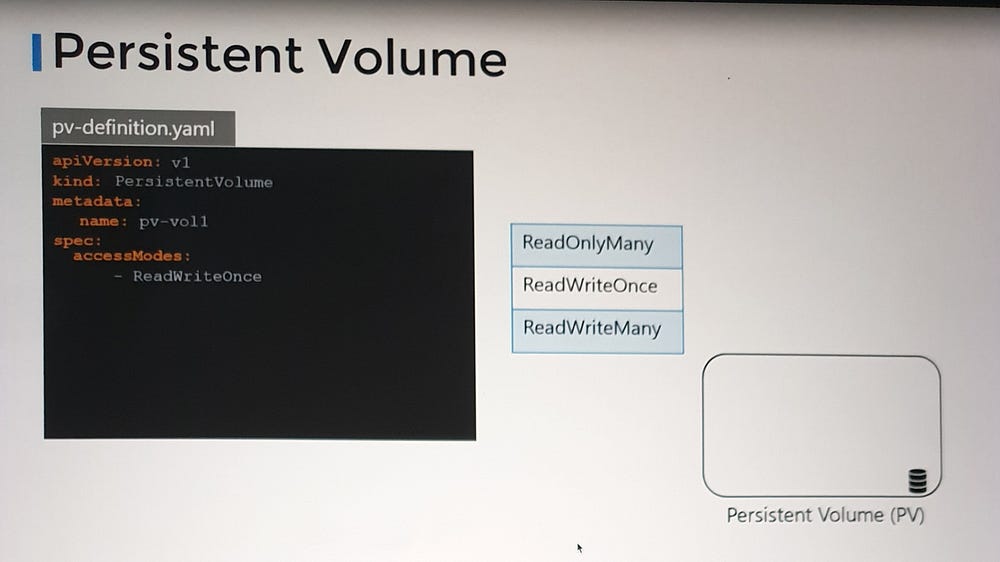
Persistent Volumes decouple storage provisioning from Pod deployment:
Cluster-Wide Storage Pool: Administrators can create a shared pool of storage that spans the entire cluster.
Centralized Management: Storage is provisioned centrally, allowing users to focus on deploying applications without worrying about storage configurations.
Reusable Storage Resources: Users can request storage from the shared pool using Persistent Volume Claims (PVCs).
How Persistent Volumes Work
- Administrator Role:
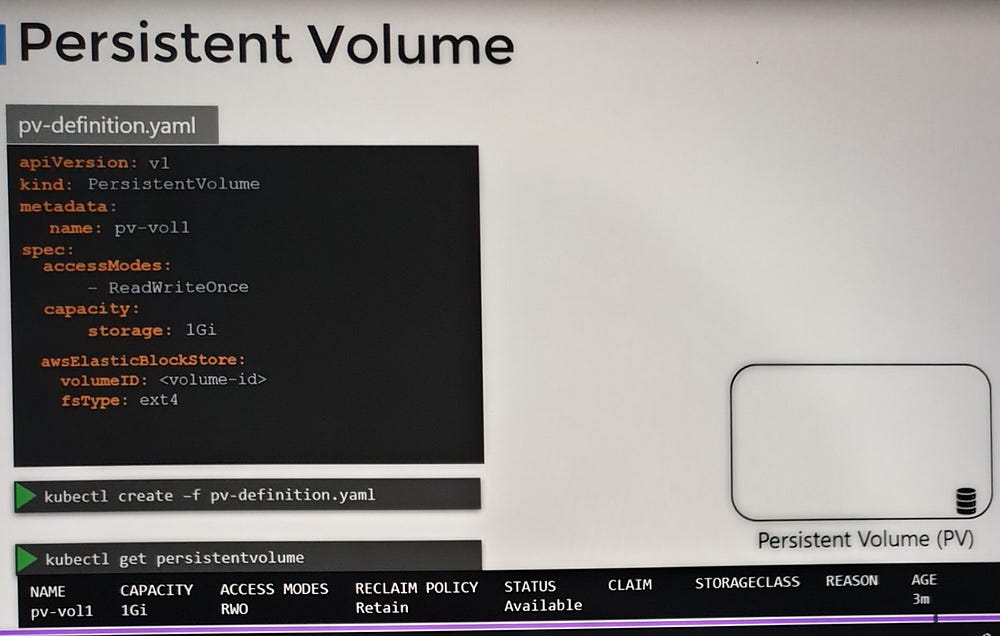
Administrators define Persistent Volumes with specific storage backends, capacity, and access modes.
These volumes are available for users to claim and use in their applications.
2. User Role:
Users create Persistent Volume Claims (PVCs), specifying their storage requirements (e.g., size, access mode).
Kubernetes binds the PVC to an appropriate PV from the pool, allowing Pods to use the allocated storage.
***Persistent Volume Claims in Kubernetes
1. Relationship Between Persistent Volumes and Persistent Volume Claims
In Kubernetes, Persistent Volumes (PVs) and Persistent Volume Claims (PVCs) are two separate objects within the Kubernetes namespace.
Administrators create Persistent Volumes, which define storage resources available across the cluster.
Users create Persistent Volume Claims to request and use specific storage from this pool.
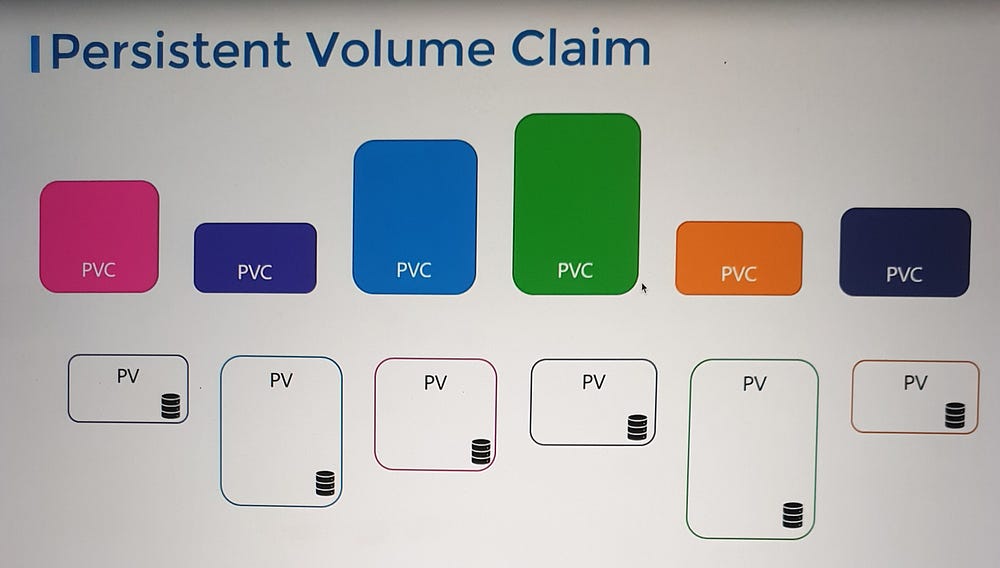
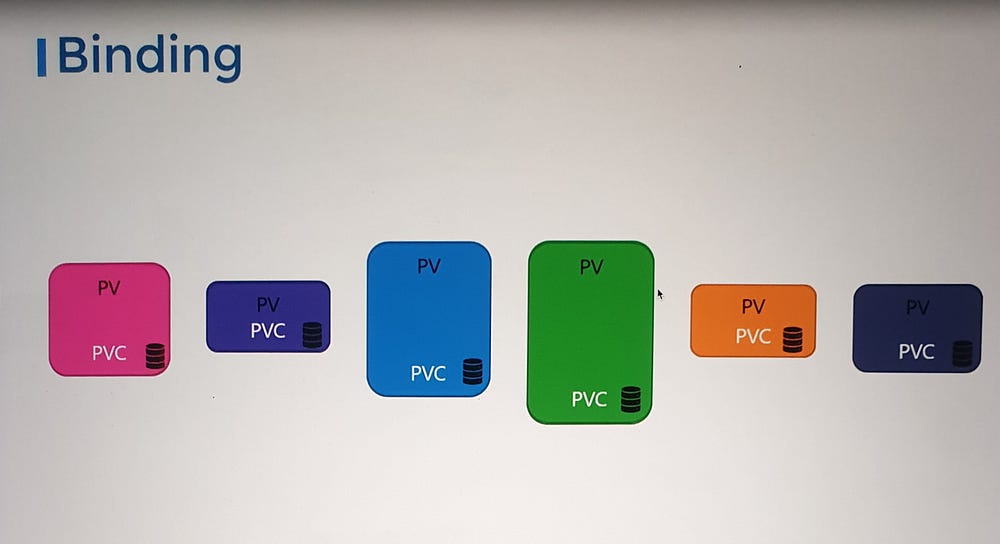
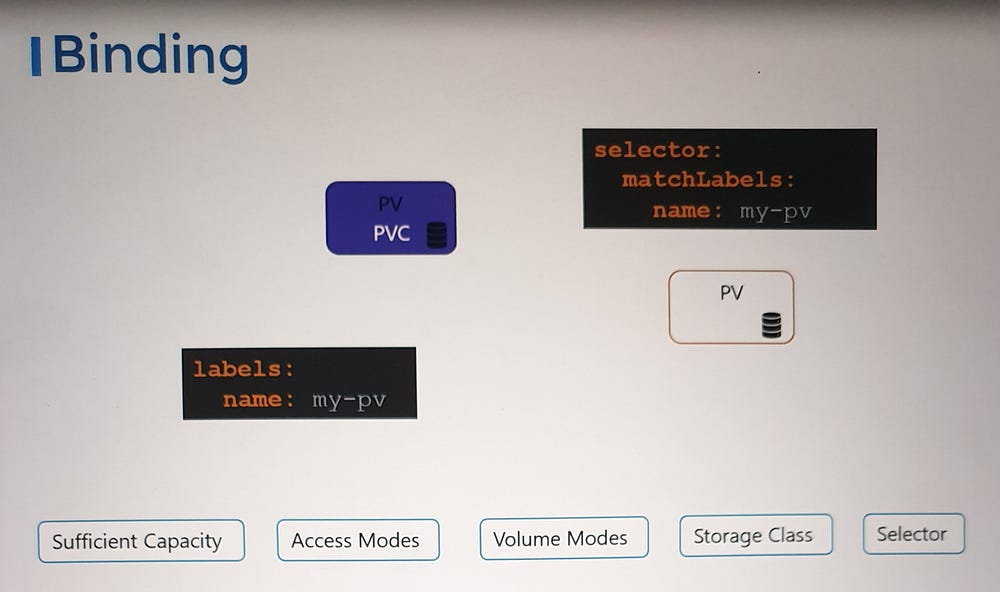
When a PVC is created, Kubernetes attempts to bind it to a suitable PV based on:
Capacity: The PV must meet or exceed the storage requested by the PVC.
Access Modes: The PV’s access modes (e.g., ReadWriteOnce, ReadOnlyMany) must match the PVC’s requirements.
Other Properties: Such as storage class, volume mode, and labels.
2. Binding Process
Once the binding process begins:
Kubernetes selects a PV that satisfies all PVC criteria.
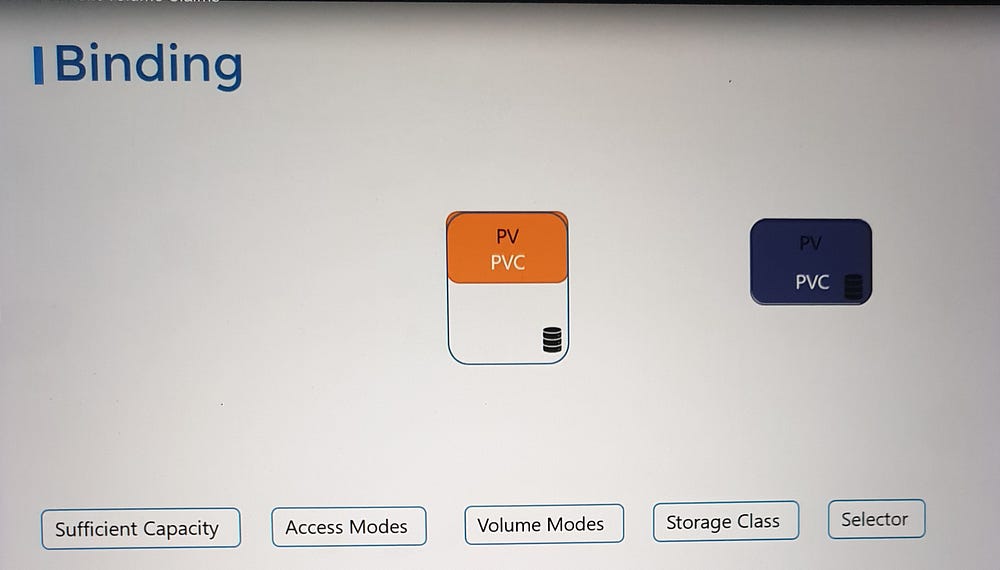
One-to-One Relationship: A PVC is bound to a single PV, and no other PVC can use the remaining capacity in the PV.
Smaller Claims, Larger Volumes: If no exact matches exist, a smaller PVC may be bound to a larger PV, as long as other criteria are satisfied.
If no suitable PVs are available:
The PVC remains in a Pending state until a new PV is provisioned or created.
Once a suitable PV becomes available, the PVC is automatically bound.
For precise control, you can use labels and selectors to ensure specific PVCs bind to specific PVs.
3. Creating a Persistent Volume Claim
Here’s how to create a PVC with an example template:
PVC Template Example:
apiVersion: v1
kind: PersistentVolumeClaim
metadata:
  name: my-claim
spec:
  accessModes:
    - ReadWriteOnce
  resources:
    requests:
      storage: 500Mi
4. PVC Binding in Action
- Create the PVC:
kubectl create -f pvc.yaml
2. View the PVC:
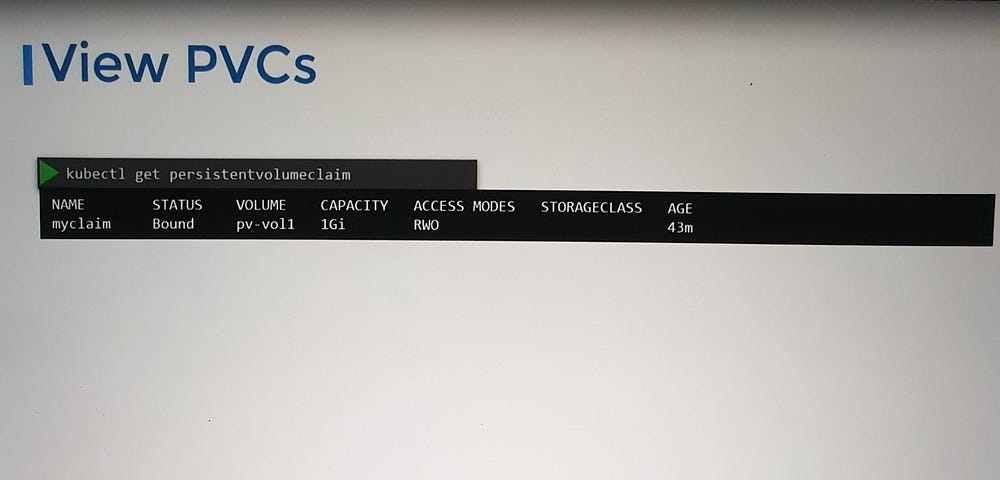
kubectl get pvc
- The PVC will initially appear in a Pending state if no suitable PV is available.
3. Binding Process:
Kubernetes checks for PVs that meet the PVC’s requirements.
If a suitable PV exists (e.g., 1 GB capacity with
ReadWriteOncemode), it binds the PVC to the PV, even if the PVC requests less than the PV’s total capacity.
4. Verify the Binding:
kubectl get pv
. The PV will show as Bound to the PVC.
5. Deleting Persistent Volume Claims
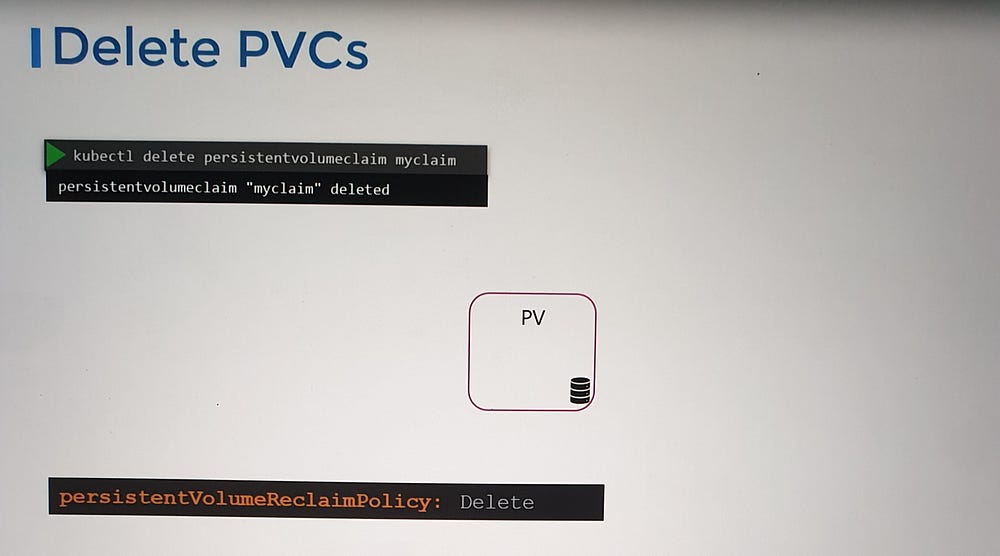
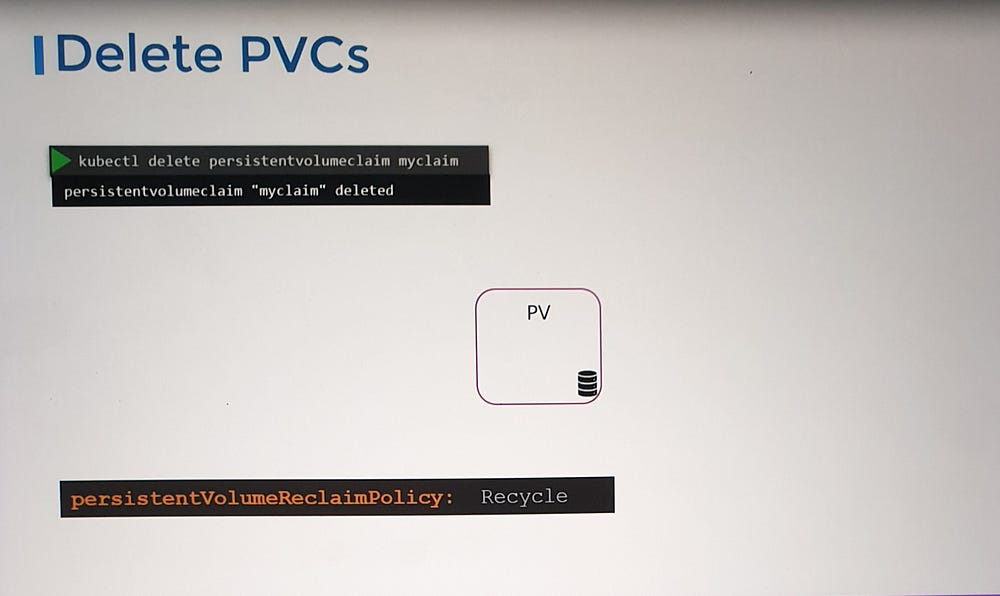
When a PVC is deleted, its associated PV is affected based on its Reclaim Policy:
Reclaim Policies:
- Retain (Default):
The PV remains in the cluster, but it is not available for reuse.
Manual intervention by an administrator is required to delete or reuse the PV.
2. Delete:
- The PV and the associated storage on the backend are deleted automatically, freeing up resources.
3. Recycle (Deprecated):
- The PV’s data is scrubbed (wiped), and the PV becomes available for other claims.
Deleting a PVC:
kubectl delete pvc my-claim
Key Considerations for PVCs
Dynamic Provisioning: Many environments support dynamic provisioning through storage classes, enabling PVs to be created on-demand when a PVC is submitted.
Pending State: Ensure that PVs with matching specifications are available to avoid PVCs getting stuck in a pending state.
Optimal Use: Use labels and selectors to bind PVCs to specific PVs when dealing with multiple PVs.
***Storage Class
Dynamic Storage Provisioning with Kubernetes Storage Classes
In previous discussions, we explored the process of creating Persistent Volumes (PVs) and Persistent Volume Claims (PVCs) to allocate storage, which can then be referenced in Pod definitions as volumes.
Challenges with Static Provisioning
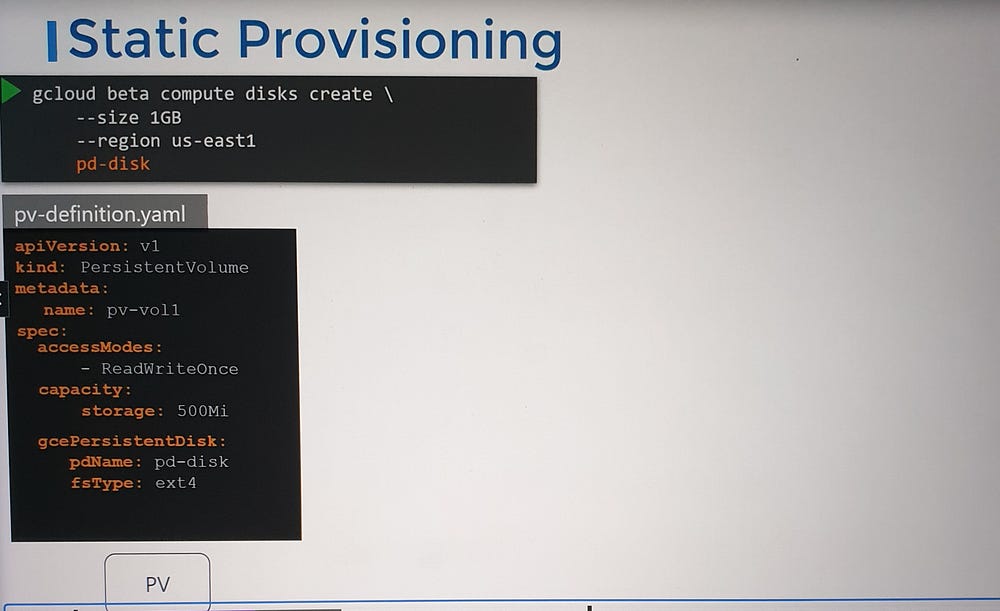
Consider the scenario of provisioning a PVC using a Google Cloud Persistent Disk. Before creating the PV:
You must manually provision the disk on Google Cloud.
You then need to create a Persistent Volume definition in Kubernetes, referencing the exact disk.
This process, known as static provisioning, can be tedious and inefficient, especially in environments where storage requirements are frequent and dynamic.
What Are Storage Classes?
To address the limitations of static provisioning, Kubernetes introduced Storage Classes, which enable dynamic storage provisioning.
Dynamic provisioning automates the creation of storage resources whenever a PVC is submitted. A Storage Class specifies a provisioner, which handles the interaction with the underlying storage system to provision resources automatically.
For example, a Storage Class using Google Cloud Persistent Disk can dynamically create and attach the required storage to Pods when a PVC requests it.
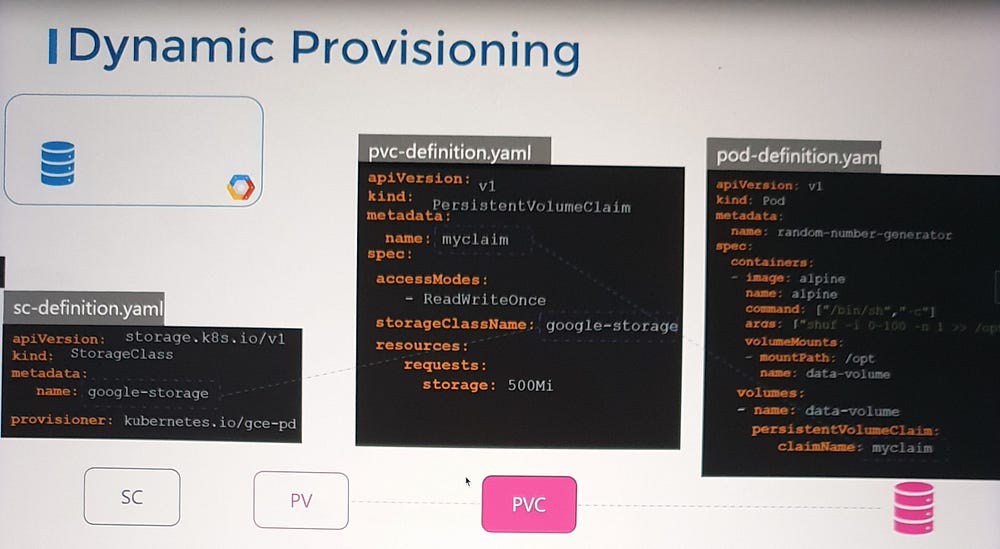
How It Works
- Defining a Storage Class
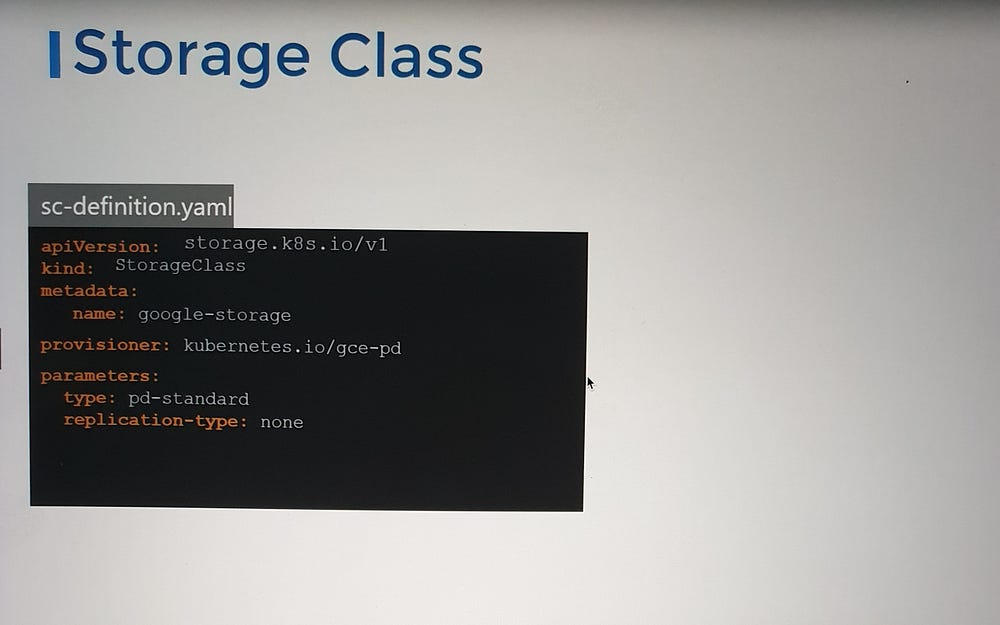
A Storage Class defines how storage is provisioned and managed. It includes:
Provisioner: Specifies the underlying storage system (e.g.,
kubernetes.io/gce-pdfor Google Cloud Persistent Disk).Parameters: Additional options like disk type, replication settings, or performance configurations.
2 . Linking a PVC to a Storage Class
When creating a PVC, you reference the desired Storage Class using the storageClassName field.
Example PVC Definition:
apiVersion: v1
kind: PersistentVolumeClaim
metadata:
  name: example-pvc
spec:
  accessModes:
    - ReadWriteOnce
  resources:
    requests:
      storage: 50Gi
  storageClassName: fast-storage
3. Automatic Provisioning
When the PVC is created, Kubernetes uses the specified Storage Class (
fast-storage) to provision the required storage.The provisioner automatically creates a Persistent Disk with the requested size and parameters.
A Persistent Volume is then created and bound to the PVC, enabling immediate usage by the Pod.
This eliminates the need for manual PV creation, as the process is fully automated by the Storage Class.
Provisioners and Customization
Kubernetes supports various provisioners for different storage systems, including:
Cloud Storage Solutions:
Google Cloud Persistent Disk (
kubernetes.io/gce-pd)AWS Elastic Block Store (
kubernetes.io/aws-ebs)Azure File/Block (
kubernetes.io/azure-file,kubernetes.io/azure-disk)On-Premises and Networked Storage:
CephFS
Portworx
ScaleIO
Each provisioner allows specific customizations. For instance, with Google Cloud Persistent Disk, you can configure:
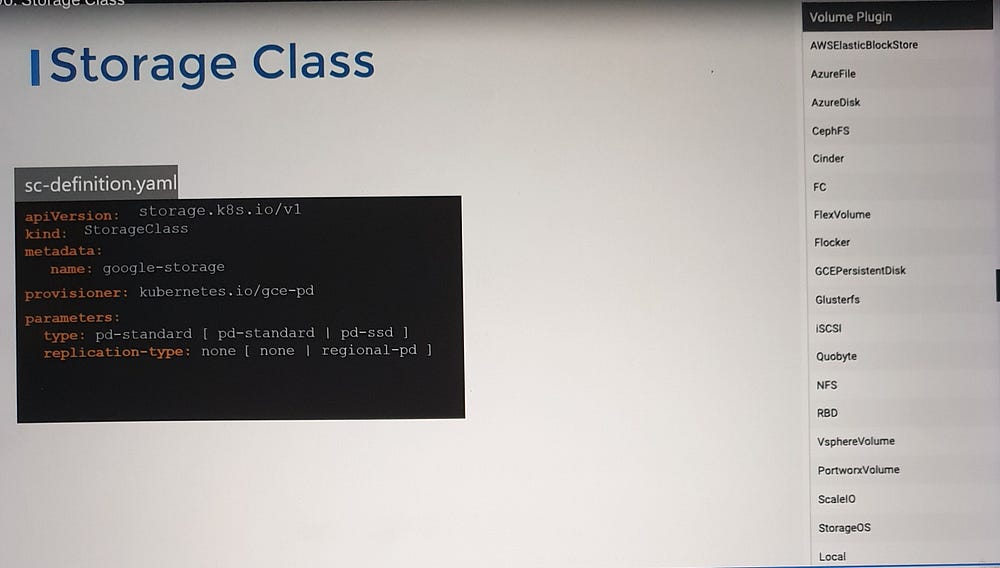
Disk Type: Choose between
pd-standard(HDD) orpd-ssd.Replication Mode: Options like
nonefor single-zone orregional-pdfor multi-zone redundancy.
Storage Classes as Tiers of Service
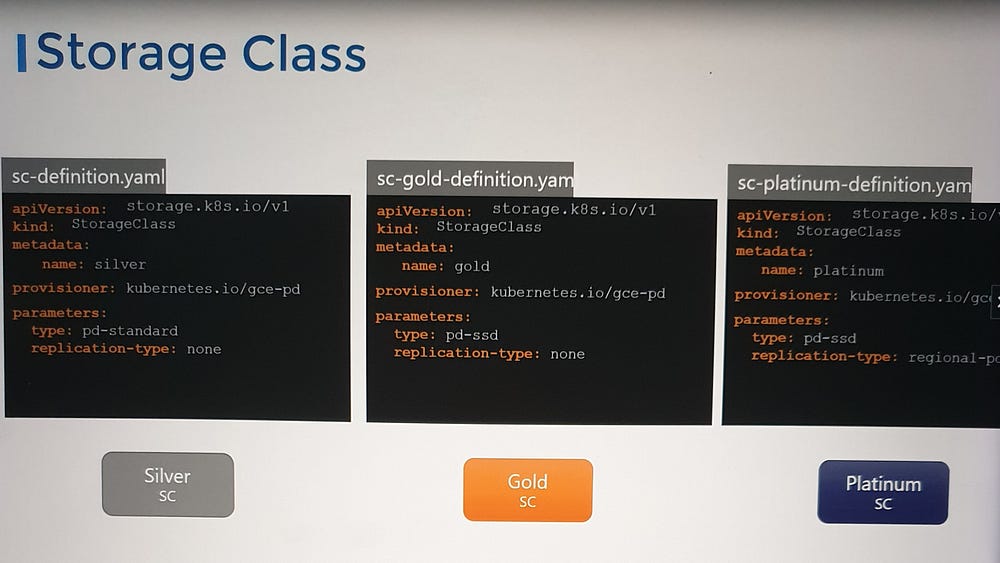
Administrators can create different tiers of service based on performance and cost requirements. For example:
Standard Class: Uses cost-effective HDDs.
Performance Class: Uses SSDs for faster IOPS.
Enterprise Class: Incorporates SSDs with regional replication for high availability.
Users can select the desired class of storage by referencing the appropriate Storage Class name in their PVCs. This flexibility ensures that storage resources align with application needs while optimizing cost and performance.
Key Benefits of Dynamic Provisioning
Automation: Automatically creates storage resources, saving time and effort.
Flexibility: Supports a wide variety of storage backends and configurations.
Scalability: Dynamically adjusts to evolving application storage needs.
Simplified Management: Reduces manual intervention by administrators.
Conclusion:
As technology evolves, so must our understanding of the platforms that drive innovation. By fostering knowledge sharing, exchanging ideas, and collaborating within the Kubernetes community, we can continue to push the boundaries of what’s possible. My journey of learning, sharing, and contributing represents a small but meaningful part of this broader collective effort to build a more capable, collaborative, and forward-thinking cloud-native future.
